Welcome to my brain dump
Let's be honest — these are just personal notes. Not polished tutorials, not official documentation, not peer-reviewed articles. Just the stuff I write down so I don't have to figure it out twice.
Why do I write everything down? Because I have the memory of a goldfish. Seriously. I can spend three hours debugging a Kubernetes eviction issue, fix it, and forget every detail of it by the next morning. So I write. It's either that or suffer through the same debugging session six months later at 2am.
If you stumbled across this, great. Some of it might help you. Some of it might be incomplete, slightly wrong, or missing context — because it was originally written for me, in a hurry, between two fires in production. Take it as it is: field notes, not gospel.
That said, I do try to make it useful. When I take the time to write something properly, it's usually because I got burned by a lack of documentation somewhere and I didn't want the next person (or future me) to go through the same pain.
Happy reading — and good luck hunting bugs. 🐛

You can also find me here if you want to exchange, disagree, or just say hi:
Kind
kind-quick-start
Kubernetes
etcd
Database space exceeded
failed to update node lease, error: etcdserver: mvcc: database space exceeded
The Etcd cluster has gone into a limited operation maintenance mode, meaning that it will only accept key reads and deletes.
Possible Solution
History compaction needs to occur :
$ export ETCDCTL_API=3
$ etcdctl alarm list
$ etcdctl endpoint status --write-out="json" | egrep -o '"revision":[0-9]*' | egrep -o '[0-9]*'
143862581
$ etcdctl compact 143862581
$ etcdctl defrag
$ etcdctl alarm disarm
This operation should be done on each etcd cluster node.
Api Crashed and etcd slowness
Most of time this issue is due to a busy etcd database due to too many objects (like events) or network slowness. In this case you can see on grafana a lot of etcd leader changes. Too many Events/jobs can be caused by a cronjob running in loop pods which are looping in error also.
Possible Solution
Give Disk priority to etcd:
An etcd cluster is very sensitive to disk latencies. Since etcd must persist proposals to its log, disk activity from other processes may cause long fsync latencies. The upshot is etcd may miss heartbeats, causing request timeouts and temporary leader loss. An etcd server can sometimes stably run alongside these processes when given a high disk priority.
On Linux, etcd’s disk priority can be configured with ionice:
# best effort, highest priority
sudo ionice -c2 -n0 -p `pgrep etcd
Count the number of events in etcd database.
ETCDCTL_API=3 etcdctl get /registry --prefix --keys-only | grep /registry/events | cut -d'/' -f4 | uniq -c| sort -nr
Identify the namespace wich is causing to many events and try to purge them with kubectl
kubectl delete events --all -n <NAMESPACE>
If the api crashed it could be complicated to clean events with kubectl. In this case you can clean events directly in etcd database.
ETCDCTL_API=3 etcdctl del /registry/events/<NAMESPACE> --prefix
Compact ETCD database on each master nodes to free space.
$ export ETCDCTL_API=3
$ etcdctl endpoint status --write-out="json" | egrep -o '"revision":[0-9]*' | egrep -o '[0-9]*'
143862581
$ etcdctl compact 143862581
$ etcdctl defrag
Give time to etcd to resync all nodes.
Finally, check job and cronjob wich are creating to many events and stop them (for cronjob) and delete jobs.
kube-tuning
🛠️ Kubernetes Node Stability and Performance: Tuning Kubelet for Better Resource Management
Author's note: This is a practical guide for Kubernetes operators and administrators looking to improve cluster resilience and performance by fine-tuning kubelet parameters. The focus is on preventing node crashes and optimizing resource usage, especially for clusters running in production environments.
🚨 Why Tuning Matters
In a Kubernetes cluster, nodes are the foundation—if a node goes down, all the workloads (pods) running on it are impacted. One common cause of node instability is poor resource management at the kubelet level. Without proper reservations and eviction policies, pods can consume all the system memory or CPU, leading to Out of Memory (OOM) errors or even system crashes.
This article covers two key areas of kubelet tuning:
- Resource Reservations and Evictions
- Graceful Node Shutdown Settings
The goal is to help you configure your nodes so they remain stable under load, avoid system-level OOMs, and terminate gracefully when needed, particularly on platforms like OpenStack.
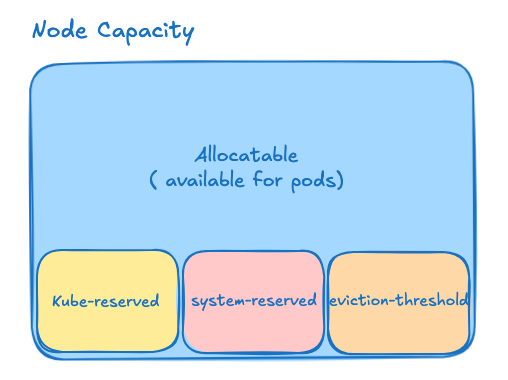
⚙️ 1. Reserve Resources to Protect the Node
❗ Problem
By default, if you don't reserve any resources for system or kubelet processes, pods can consume 100% of a node’s memory or CPU. This can starve the system, cause critical services to crash, and render the node temporarily unusable.
✅ Solution: Use kubeReserved, systemReserved, and evictionHard
systemReserved: Resources set aside for system-level processes (e.g., systemd, journald).kubeReserved: Resources reserved for Kubernetes components like kubelet, container runtime, etc.evictionHard: Memory and storage thresholds at which kubelet starts evicting pods before the system runs out of resources completely.
🔧 Example Configuration
kubeReserved:
  cpu: 420m
  memory: 9Gi
systemReserved:
  cpu: 100m
  memory: 1Gi
evictionHard:
  memory.available: 100Mi
  nodefs.available: 10%
  imagefs.available: 15%
  nodefs.inodesFree: 5%
💡 These values can be adjusted based on your node specs (CPU cores, total memory). Below is a basic recommendation logic for automation tools like Ansible
KubeletKubeReservedMemory: >-
  {% if ansible_memtotal_mb >= 256000 %}13Gi
  {% elif ansible_memtotal_mb >= 128000 %}9Gi
  {% elif ansible_memtotal_mb >= 64000 %}6Gi
  {% elif ansible_memtotal_mb >= 31900 %}4Gi
  {% elif ansible_memtotal_mb >= 16000 %}3Gi
  {% elif ansible_memtotal_mb >= 8000 %}2Gi
  {% elif ansible_memtotal_mb >= 4000 %}1Gi
  {% else %}255Mi
  {% endif %}
KubeletKubeReservedCpu: >-
  {% if ansible_processor_vcpus >= 64 %}740m
  {% elif ansible_processor_vcpus >= 32 %}420m
  {% elif ansible_processor_vcpus >= 16 %}260m
  {% elif ansible_processor_vcpus >= 8 %}180m
  {% elif ansible_processor_vcpus >= 4 %}140m
  {% elif ansible_processor_vcpus >= 2 %}100m
  {% elif ansible_processor_vcpus >= 1 %}60m
  {% else %}10m
  {% endif %}
apiVersion: kubelet.config.k8s.io/v1beta1
kind: KubeletConfiguration
kubeReserved:
  cpu: {{ KubeletKubeReservedCpu }}
  memory: {{ KubeletKubeReservedMemory }}
systemReserved:
  cpu: 100m
  memory: 1Gi
evictionHard:
  memory.available: 100Mi
  nodefs.available: 10%
  imagefs.available: 15%
  nodefs.inodesFree: 5%
📘 Official Docs: Kubernetes Resource Reservations Reserve-compute-resources
📘 More details:
Part of this tuning could be enabled by default on images built with Image Builder. You can find the script here.
⏱️ 2. Configure Graceful Shutdown for Your Nodes
❗ Problem
During system shutdown or reboot (planned or unplanned), nodes can terminate without properly shutting down running pods. This can result in data loss, application errors, and inconsistent states.
✅ Solution: Enable and Tune shutdownGracePeriod
Kubelet uses systemd inhibitor locks to delay the node shutdown and give time for pods to terminate gracefully. This feature improves application reliability, especially for stateful or critical services.
🔧 Recommended Settings:
shutdownGracePeriod=60s
shutdownGracePeriodCriticalPods=30s
This configuration:
- Reserves 60 seconds to complete the node shutdown.
- Gives 30 seconds to gracefully shut down regular pods.
- Keeps the last 30 seconds for critical system pods.
📘 Official Docs:
✅ Final Thoughts
Tuning your kubelet settings is a low-effort, high-impact improvement that can drastically increase the resilience and performance of your Kubernetes nodes. Especially in production environments or cloud platforms like OpenStack, it's crucial to: Reserve resources for essential system components Define eviction thresholds to avoid OOM errors Gracefully shut down workloads to avoid data corruption
By applying these best practices, you ensure that your nodes stay healthy and your applications remain available - even under heavy load or system shutdown events.
Pod Eviction When a Node Goes NotReady or Unreachable
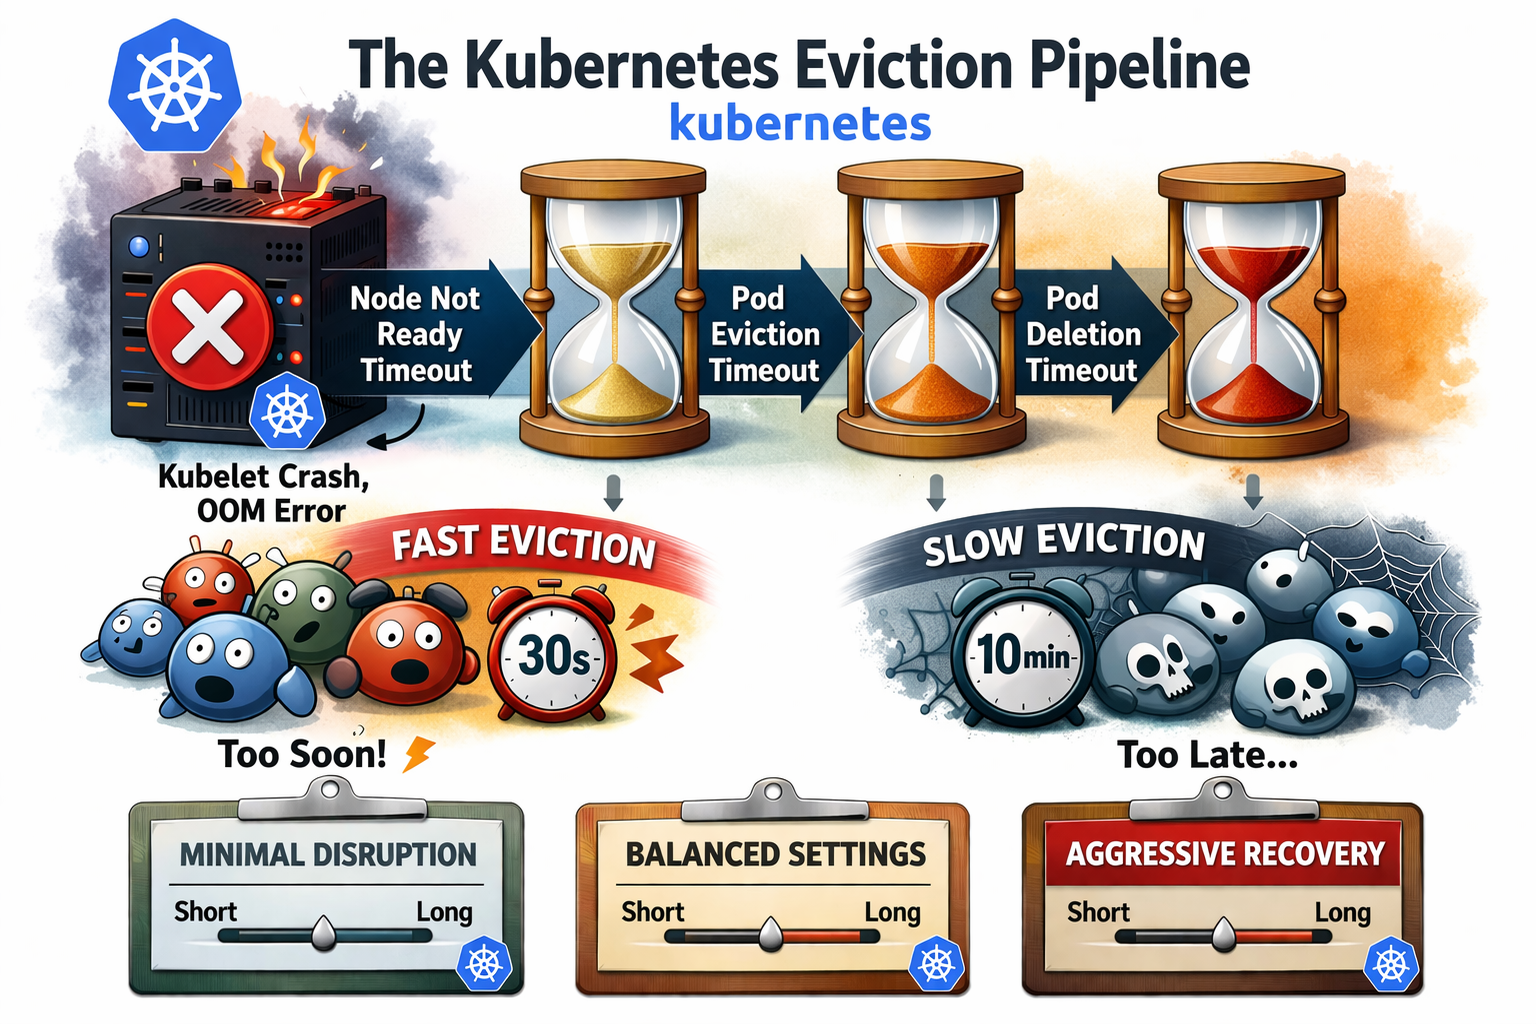
When a Kubernetes node disappears — network failure, kubelet crash, OOM — your pods don't evict instantly. There's a deliberate pipeline of timeouts that decides when and whether to reschedule workloads. Misconfigure it and you get two equally bad outcomes: pods evicted after 30 seconds on a node that was just briefly overloaded, or pods stuck for 10 minutes on a genuinely dead node.
This article explains how the eviction pipeline works, what each knob does, and gives you three ready-to-use configurations depending on your tolerance for disruption.
How the eviction pipeline works
One of the most common mistakes is tuning a single parameter and wondering why nothing changes. Eviction behavior is the product of a combination of settings spread across three different components — kubelet, kube-controller-manager, and kube-apiserver. Each one controls a different phase of the pipeline, and they must be tuned together or the result is unpredictable.
Three components cooperate in sequence:
| Component | Role |
|---|---|
kubelet | Sends heartbeats every nodeStatusUpdateFrequency |
node-lifecycle-controller (kcm) | Watches heartbeats, sets Ready=False/Unknown, applies taints |
taint-eviction-controller (kcm) | Evicts pods once tolerationSeconds expires |
The total eviction time is always:
T_eviction = node-monitor-grace-period + tolerationSeconds
All parameters at a glance
| Parameter | Component | Where to set | Effect on eviction |
|---|---|---|---|
nodeStatusUpdateFrequency | kubelet | KubeletConfiguration | Frequency of heartbeats sent to the apiserver. Increasing it reduces API load but lengthens the detection window. |
nodeStatusReportFrequency | kubelet | KubeletConfiguration | Frequency of full node status reports (separate from heartbeats). Usually left at default (5min). |
node-monitor-period | kube-controller-manager | flag --node-monitor-period | How often the node lifecycle controller checks heartbeat freshness. Default: 5s. |
node-monitor-grace-period | kube-controller-manager | flag --node-monitor-grace-period | Time without heartbeat before node is marked NotReady/Unknown. Must be ≥ 3× nodeStatusUpdateFrequency. |
default-not-ready-toleration-seconds | kube-apiserver | flag --default-not-ready-toleration-seconds | Injected tolerationSeconds for not-ready:NoExecute on every new pod. |
default-unreachable-toleration-seconds | kube-apiserver | flag --default-unreachable-toleration-seconds | Injected tolerationSeconds for unreachable:NoExecute on every new pod. |
terminated-pod-gc-threshold | kube-controller-manager | flag --terminated-pod-gc-threshold | Number of terminated pods before garbage collection runs. Does not affect eviction timing. |
shutdownGracePeriod | kubelet | KubeletConfiguration | Grace period for graceful node shutdown. Separate from the eviction pipeline — only applies to planned shutdown. |
tolerations (per pod) | pod spec | manifest / admission webhook | Can override the apiserver-injected defaults per workload. Stateful pods should set longer values explicitly. |
NotReady vs Unreachable — two different taints
NotReady | Unreachable | |
|---|---|---|
| Node condition | Ready=False | Ready=Unknown |
| Taint applied | node.kubernetes.io/not-ready:NoExecute | node.kubernetes.io/unreachable:NoExecute |
| Typical cause | Kubelet degraded, OOM, disk pressure | Network failure, OS crash, node powered off |
| Kubelet responding? | Partially | Not at all |
| False positive risk | Medium | High (network flapping) |
Both taints trigger eviction via tolerationSeconds. The difference is the cause, not the mechanism.
The golden rule
node-monitor-grace-period ≥ 3 × nodeStatusUpdateFrequency
This ensures at least 3 missed heartbeats are required before a node is declared unhealthy. Anything less and a momentary kubelet hiccup or network blip can evict production pods unnecessarily.
Timeline — what actually happens
When a node goes NotReady (kubelet degraded)
T+0s    kubelet stops sending heartbeats
T+Xs    last known heartbeat (depends on nodeStatusUpdateFrequency)
T+Gs    grace-period expires → taint not-ready:NoExecute applied
T+G+Ts  tolerationSeconds expires → pods enter Terminating
When a node goes Unreachable (network / crash)
Same timeline, but the taint is unreachable:NoExecute and Ready=Unknown instead of Ready=False.
The risk of false positives is higher — a 30-second network partition is enough to trigger eviction with an aggressive config.
Eviction timeline — the three scenarios compared

The three configurations
🔴 Aggressive — fast failover, high false positive risk
Use case: stateless workloads, HA deployments where you want fast rescheduling and can tolerate occasional unnecessary evictions.
# kube-apiserver
--default-not-ready-toleration-seconds=10
--default-unreachable-toleration-seconds=10

# kube-controller-manager
--node-monitor-period=2s
--node-monitor-grace-period=20s
--terminated-pod-gc-threshold=50

# kubelet
nodeStatusUpdateFrequency: 10s
Pod tolerations (auto-injected):
tolerations:
  - effect: NoExecute
    key: node.kubernetes.io/not-ready
    operator: Exists
    tolerationSeconds: 10
  - effect: NoExecute
    key: node.kubernetes.io/unreachable
    operator: Exists
    tolerationSeconds: 10
T_eviction = 20s + 10s = 30s
Golden rule: 20s ≥ 3×10s=30s → ❌ NOT MET (only 2 missed heartbeats)
⚠️ A kubelet under CPU pressure or a 15-second network blip is enough to evict pods. Not recommended for stateful workloads or clusters with variable network latency.
Well suited for small, fast-starting containers that reschedule in seconds and have no local state — think sidecars, short-lived jobs, or replicated stateless services with multiple replicas.
Watch out during apiserver maintenance: if your control plane sits behind a load balancer or kube-vip, a leader failover or VIP switchover can take 10–30 seconds. With a 30s eviction window, pods may start evicting before the new apiserver is reachable — causing a cascade that wouldn't happen with a less aggressive config. Make sure your LB/kube-vip failover time is well below
tolerationSeconds.
🟡 Medium — tolerant to flapping, faster than default
Use case: bare-metal clusters, industrial environments, nodes with slow or unreliable heartbeat paths (high kubelet nodeStatusUpdateFrequency), or any cluster where false evictions are more costly than slow recovery.
# kube-apiserver
--default-not-ready-toleration-seconds=60
--default-unreachable-toleration-seconds=60

# kube-controller-manager
--node-monitor-period=5s
--node-monitor-grace-period=2m
--terminated-pod-gc-threshold=50

# kubelet
nodeStatusUpdateFrequency: 20s
Pod tolerations:
tolerations:
  - effect: NoExecute
    key: node.kubernetes.io/not-ready
    operator: Exists
    tolerationSeconds: 60
  - effect: NoExecute
    key: node.kubernetes.io/unreachable
    operator: Exists
    tolerationSeconds: 60
T_eviction = 120s + 60s = 3min
Golden rule: 120s ≥ 3×20s=60s → ✅ MET (6 missed heartbeats)
The kubelet heartbeats every 20s, and 6 consecutive misses are required before the node is considered unhealthy. Very resilient to network flapping and temporary kubelet load spikes. Recommended for CAPI-managed clusters and environments where nodes are provisioned/deprovisioned frequently.
🟢 Normal — general purpose
Use case: general-purpose clusters, mixed workloads. Good balance between recovery speed and false positive tolerance.
# kube-apiserver
--default-not-ready-toleration-seconds=300
--default-unreachable-toleration-seconds=300

# kube-controller-manager
--node-monitor-period=5s
--node-monitor-grace-period=40s
--terminated-pod-gc-threshold=12500

# kubelet
nodeStatusUpdateFrequency: 10s
Pod tolerations:
tolerations:
  - effect: NoExecute
    key: node.kubernetes.io/not-ready
    operator: Exists
    tolerationSeconds: 300
  - effect: NoExecute
    key: node.kubernetes.io/unreachable
    operator: Exists
    tolerationSeconds: 300
T_eviction = 40s + 300s = ~5min40s
Golden rule: 40s ≥ 3×10s=30s → ✅ MET (4 missed heartbeats)
These are close to the Kubernetes upstream defaults. The 5-minute
tolerationSecondsmeans pods stay on a dead node for a while before rescheduling — which is intentional to avoid thundering herd on short outages.
Comparison summary
| 🔴 Aggressive | 🟡 Medium | 🟢 Normal (default) | |
|---|---|---|---|
nodeStatusUpdateFrequency | 10s | 20s | 10s |
node-monitor-grace-period | 20s | 120s | 40s |
tolerationSeconds | 10s | 60s | 300s |
| Total eviction time | ~30s | ~3min | ~5min40s |
| Golden rule met | ❌ | ✅ | ✅ |
| Missed heartbeats before eviction | 2 | 6 | 4 |
| False positive risk | High | Very low | Low |
| Best for | Stateless, HA | Bare-metal, industrial | General purpose |
Key takeaways
- Always verify the golden rule
grace-period ≥ 3 × heartbeat— violating it makes eviction non-deterministic. tolerationSecondsis injected at pod creation by theDefaultTolerationSecondsadmission plugin — changing the apiserver flag only affects new pods, not running ones.- Unreachable is riskier than NotReady for false positives. A 30-second network partition is invisible to users but enough to trigger eviction in an aggressive config.
- Node shutdown is a separate mechanism (
shutdownGracePeriodon kubelet) — the eviction pipeline above only applies to unexpected failures. - For stateful workloads (databases, queues), always use Medium or at minimum Normal, and consider Pod Disruption Budgets on top.
Conclusion
These parameters are not cosmetic — they directly control how your cluster reacts to failure, and a wrong value in either direction causes real damage: unnecessary disruption of healthy workloads, or pods stuck on dead nodes for minutes.
There is no universal right answer. The correct values depend on three things you need to assess together:
- Your workloads — a stateless nginx replica and a PostgreSQL primary do not have the same tolerance for eviction. Fast-starting containers can afford aggressive settings; anything with local state, slow startup, or strict ordering cannot.
- Your services — a batch job tolerates 5 minutes of downtime; a payment API does not. SLOs and SLAs should drive your
tolerationSeconds, not the other way around. - Your underlying infrastructure — bare-metal with occasional flapping NICs, a cloud provider with live migration, kube-vip with a 20-second failover, or a CAPI-managed cluster that reprovisioning nodes regularly all have different heartbeat reliability profiles.
When in doubt, start with Normal (the Kubernetes default), measure actual node failure and recovery times in your environment, then adjust. Going aggressive without understanding your LB failover time or kubelet startup latency is a reliable way to cause incidents during maintenance windows.
--goaway-chance: The Parameter You Should Know to Keep Your Kubernetes API Server Stable 🚀

Symptoms ⚠️
- The most recently started
kube-apiserverreceives very little traffic. - The number of active goroutines on that server is significantly lower than on the others.
- During upgrades or restarts, one server can become overloaded, taking over all the connections from a previously stopped instance, sometimes resulting in OOMKilled errors.💥
Root Cause 🧠
The kube-apiserver uses HTTP/2 and maintains persistent connections. Once established, these connections are never rotated or rebalanced, regardless of the load balancing algorithm being used (round-robin, IP hash, etc.).
As a result, if you have three API servers and one of them restarts, it will not receive any new connections automatically. The already established client connections remain bound to the older servers, leaving the newly restarted one idle. 💤
The Solution: --goaway-chance 🛠️
The --goaway-chance parameter in kube-apiserver is a powerful but often overlooked option that can dramatically improve control plane stability in large clusters. 💡
Official Description 📘
To prevent HTTP/2 clients from getting stuck on a single API server, this flag allows the server to randomly close a connection by sending a
GOAWAYsignal.
Ongoing requests will not be interrupted, and the client will reconnect, often hitting a different API server through the load balancer. 🔄
- Range: from
0(disabled) to0.02(2% of requests). - Recommended starting point:
0.001(0.1%, or 1 in every 1000 requests). - Warning: Do not enable this if you have a single API server or no load balancer in front. ⚠️
Configuration Example 🧪
Add the following flag to your kube-apiserver startup configuration:
--goaway-chance=0.001
Expected Result 📊
Once enabled, you'll likely observe a balanced load across all your API servers. Here's a simple before/after illustration:
Before:
- server 1: 70% load
- server 2: 30%
- server 3: 0%

After enabling --goaway-chance:
- server 1: 33%
- server 2: 33%
- server 3: 33%
This helps prevent overloads and ensures better resource utilization across your control plane.
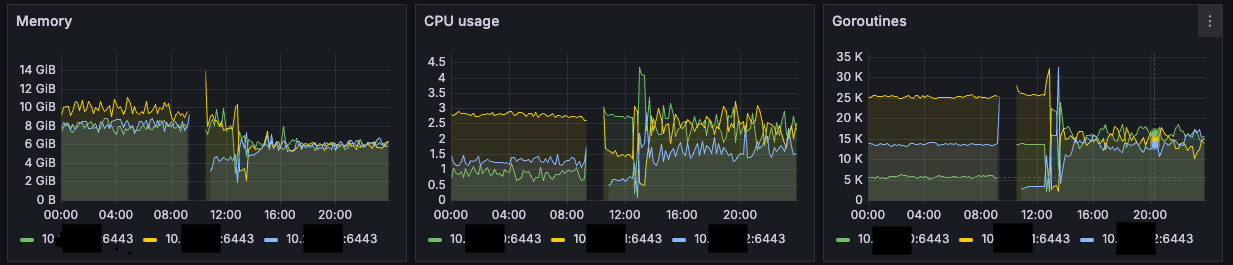 On the graph below, we can see the difference before and after applying the parametermage_caption
Conclusion 🎯
If you're running multiple kube-apiserver instances behind a load balancer, the --goaway-chance parameter is an essential tool to ensure load distribution and cluster stability. 🔐
It’s easy to configure, has minimal impact, and can prevent costly downtimes or crashes during maintenance operations. ⏱️
Don’t overlook it. 💪
Split your events (or other keys) into separate etcd clusters
(Stop Letting Kubernetes Events Kill Your etcd — Here's the Fix)
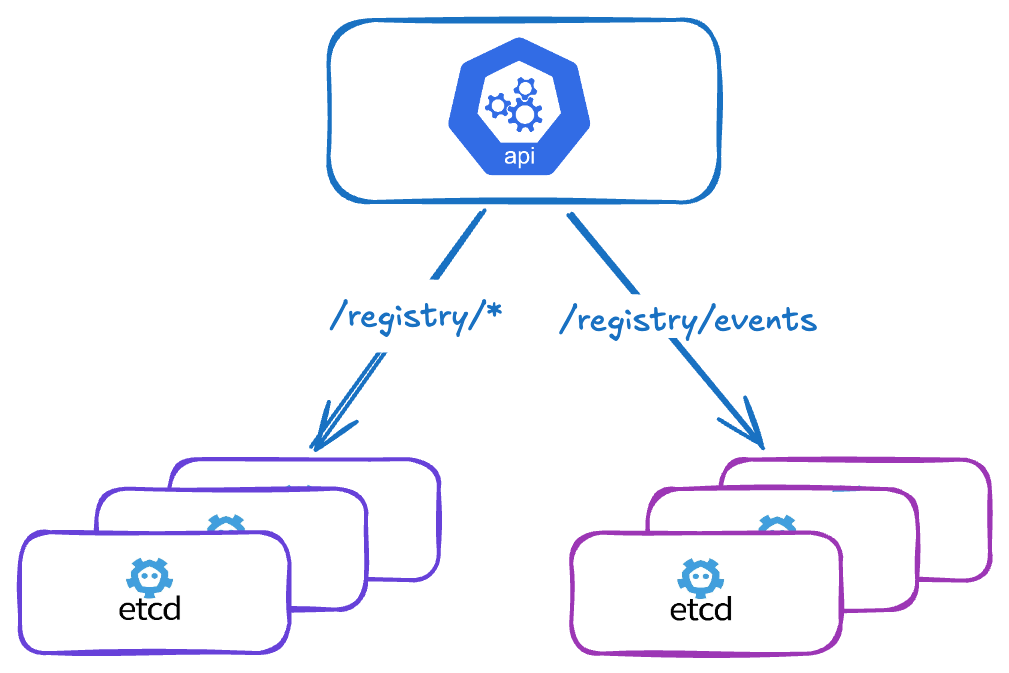
In large Kubernetes clusters, events can quickly become a problem. While they are useful for debugging and observability, they generate a very high volume of writes to etcd, which can severely degrade the performance of the main etcd cluster and therefore impact the entire Kubernetes API.
Problem
In Kubernetes, events are stored in etcd under the prefix /registry/events.
In high-activity environments (many pods, deployments, controllers…), this prefix becomes heavily used:
- Massive and continuous writes
- High data turnover (short TTL by default: 1h)
- Pressure on etcd storage and CPU
- More frequent etcd compaction and defragmentation
Solution: offload certain keys to a dedicated etcd
Kubernetes allows redirecting certain keys to a separate etcd cluster via the kube-apiserver flag:
--etcd-servers-overrides
Format
--etcd-servers-overrides=<prefix>#<server1>,<server2>,<server3>
Servers within the same group are separated by commas (
,). Multiple overrides are also separated by semicolons (;).
kube-apiserver configuration example
# Main etcd
- --etcd-servers=https://10.0.0.11:2379,https://10.0.0.12:2379,https://10.0.0.13:2379
- --etcd-cafile=/etc/kubernetes/pki/etcd/ca.crt
- --etcd-certfile=/etc/kubernetes/pki/apiserver-etcd-client.crt
- --etcd-keyfile=/etc/kubernetes/pki/apiserver-etcd-client.key

# Offloading events to a dedicated etcd cluster
- --etcd-servers-overrides=/events#https://10.0.1.20:2379,https://10.0.1.21:2379,https://10.0.1.22:2379
Benefits
- Reduced load on the main etcd
- Better overall API server performance
- Isolation of highly volatile data
- Independent scalability of both clusters
- Independent compaction/defragmentation cycles
Limitations and constraints
Shared authentication
The kube-apiserver uses the same TLS client certificates (etcd-certfile / etcd-keyfile) for all etcd clusters, including overrides. It is not possible to specify different certificates per cluster.
In practice: both etcd clusters must be signed by the same CA and accept the same kube-apiserver client certificate.
Availability
If the events-dedicated etcd becomes unavailable:
- The kube-apiserver keeps attempting to write/read events
- Timeouts and retries impact overall performance
- The main etcd remains operational, but the API server is degraded
Best practices
- Deploy the events etcd in high availability (minimum 3 nodes)
- Monitor both etcd clusters separately
- Tune event retention:
--event-ttl=1h(default value) - Limit overrides to highly volatile keys (events, leases…)
- Do not offload critical keys such as
/registry/podsor/registry/secrets
Other candidate keys
Beyond events, other prefixes can be offloaded depending on the use case:
| Prefix | Description |
|---|---|
/events | Kubernetes events (most common case) |
/leases | Leader election and node heartbeats |
/pods | Not recommended — critical key |
Conclusion
Offloading /registry/events to a separate etcd cluster is an effective optimization for large Kubernetes clusters where events become a real bottleneck.
This must be set up carefully: the dedicated etcd must be highly available, and both clusters must share the same PKI.
Primarily intended for very high-throughput production environments.
🧠 Essential Kubernetes Commands
🏗️ Kubernetes Cluster Commands
kubectl cluster-info              # Display cluster information
kubectl get nodes -o wide         # List all nodes in the cluster and show details
kubectl get crd                   # Display all CRD in cluster
kubectl api-versions              # Display Api version on the cluster
🧩 Kubernetes Pod Commands
kubectl get pods                        # List all pods
kubectl get pods -o wide                # Show detailed information about pods
kubectl get pods -l <label>=<value>     # List pods with a specific label
kubectl get pod <name>                  # Show one specific pod
kubectl describe pod <name>             # Show pod details
kubectl logs <pod>                      # View pod logs
kubectl exec -it <pod> -- /bin/sh     # Execute a command inside a pod
kubectl delete pod <name>               # Delete a pod
kubectl explain pod <resource>          # Display an overview of the Pod resource
🚀 Kubernetes Deployment Commands
kubectl create deployment <name> --image=<image>                # Create a deployment
kubectl get deployments                                         # List all deployments
kubectl describe deployment <name>                              # Show deployment details
kubectl scale deployment <name> --replicas=<number>             # Scale a deployment
kubectl rollout restart deployment/<name>                       # Restart a deployment
kubectl rollout status deployment/<name>                        # View deployment status
kubectl create deployment <name> --image=<image> -o yaml        # Create deployment and print YAML
kubectl create deployment <name> --image=<image> --dry-run=client -o yaml  # Generate YAML without applying
kubectl create deployment <name> --image=<image> -o yaml > name.yaml        # Store YAML into a file
🌐 Kubernetes Service Commands
kubectl get services                                            # List all services
kubectl describe service <name>                                 # Show service details
kubectl expose pod <name> --port=<port> --target-port=<target>  # Expose a pod as a service
kubectl delete service <name>                                   # Delete a service
kubectl port-forward <pod> <local-port>:<remote-port>           # Forward a local port to a pod
🔐 Kubernetes ConfigMap Commands
kubectl create configmap <name> --from-literal=<key>=<value>   # Create a ConfigMap
kubectl create configmap my-config --from-file=path/to/bar     # Create a new config map named my-config based on folder bar
kubectl get configmaps                                          # List all ConfigMaps
kubectl describe configmap <name>                               # Show ConfigMap details
🔐 Kubernetes Secret Commands
kubectl create secret generic <name> --from-literal=<key>=<value>   # Create a Secret
kubectl get secrets                                                 # List all Secrets
kubectl get secret <name> -o yaml                                   # display a Secrets
🗂️ Kubernetes Namespace Commands
kubectl get namespaces                      # List all namespaces
kubectl create namespace <name>             # Create a namespace
kubectl delete namespace <name>             # Delete a namespace
kubectl config set-context --current --namespace=<name>   # Switch to a namespace
🧱 Kubernetes Resource Commands
kubectl get <type>                      # List resources of a specific type
kubectl apply -f <file>                 # Apply resource config file
kubectl edit <type> <name>              # Edit resource in terminal
kubectl delete -f <file>                # Delete resources from file
kubectl get <type>                      # List resources again (confirmation)
kubectl describe <type> <name>          # Show detailed info about a resource
📊 Kubernetes Statistics & Event Commands
kubectl get nodes                       # Display node resource usage
kubectl top nodes                       # Show node metrics (CPU/Memory)
kubectl top pods                        # Show pod metrics
kubectl get events                      # Display recent cluster events
🔑 Kubernetes Permissions
kubectl get Roles -n <namespace>
kubectl get ClusterRole
kubectl get RoleBinding -n <namespace> # Display node usage
kubectl get ClusterRoleBinding  # Display node usage
kubectl get clusterroles system:discovery -o yaml
kubectl create role pod-reader --verb=get --verb=list --verb=watch --resource=pods #Create a Role named "pod-reader" that allows users to perform get, watch and list on pods:
# Check to see if service account "foo" of namespace "dev" can list pods in the namespace "prod"
# You must be allowed to use impersonation for the global option "--as"
kubectl auth can-i list pods --as=system:serviceaccount:dev:foo -n prod
Debug Kubernetes
Test DNS
Test Cluster Dns using busybox pod:
kubectl exec -it busybox -n <NAMESPACE> -- nslookup kubernetes.default
Cluster-Api
capi-quick-start
The goal of this page is to provide quick commands to get started with Cluster API in under 5 minutes. For more detailed information, please refer to the official Cluster API documentation at: https://cluster-api.sigs.k8s.io/
Prerequisites:
Install Kind
Install Kind following this Link or:
[ $(uname -m) = x86_64 ] && curl -Lo ./kind https://kind.sigs.k8s.io/dl/v0.27.0/kind-linux-amd64
chmod +x ./kind
sudo mv ./kind /usr/local/bin/kind
Install Kubectl
curl -LO "https://dl.k8s.io/release/$(curl -L -s https://dl.k8s.io/release/stable.txt)/bin/linux/amd64/kubectl
sudo install -o root -g root -m 0755 kubectl /usr/local/bin/kubectl
Install Cluster-Api
Create a Kind cluster with the kind config kind-cluster.yaml in this repo.
kind create cluster
Install Clusterctl
Clusterctl is the client to deploy cluster with capi.
curl -L https://github.com/kubernetes-sigs/cluster-api/releases/download/v1.9.5/clusterctl-linux-amd64 -o clusterctl
sudo install -o root -g root -m 0755 clusterctl /usr/local/bin/clusterctl
clusterctl version
Install CAPI and CAPO ( ClusterAPi for Opentack)
First export this variable to enable cluster-ressource-set feature:
export EXP_CLUSTER_RESOURCE_SET=true
Now we will install clusterAPI (capi) and clusterApi Openstack Controller (capo) using clusterctl in our kind.
kubectl apply -f https://github.com/k-orc/openstack-resource-controller/releases/latest/download/install.yaml
clusterctl init --infrastructure openstack
Now your kind should look like:
ubuntu@jeff:~$ kubectl get pods -A | grep -v kube-system
NAMESPACE                           NAME                                                             READY   STATUS    RESTARTS        AGE
capi-kubeadm-bootstrap-system       capi-kubeadm-bootstrap-controller-manager-66bb86b8b8-d6jtb       1/1     Running   3 (20h ago)     5d17h
capi-kubeadm-control-plane-system   capi-kubeadm-control-plane-controller-manager-7bd59d5f69-bb69p   1/1     Running   2 (2d12h ago)   5d17h
capi-system                         capi-controller-manager-578674dd86-xhk7r                         1/1     Running   3 (20h ago)     5d17h
capo-system                         capo-controller-manager-79f47999df-w5p8k                         1/1     Running   3 (20h ago)     4d20h
cert-manager                        cert-manager-94d5c9976-pjw67                                     1/1     Running   2 (2d12h ago)   5d17h
cert-manager                        cert-manager-cainjector-6c49b5cdcc-bshqd                         1/1     Running   1 (2d12h ago)   5d17h
cert-manager                        cert-manager-webhook-595556d86b-zxm82                            1/1     Running   1 (2d12h ago)   5d17h
local-path-storage                  local-path-provisioner-7dc846544d-4tzbs                          1/1     Running   1 (2d12h ago)   5d18h
orc-system                          orc-controller-manager-df6c48588-mjdz5                           1/1     Running   3 (20h ago)     5d17h
Create your first Cluster CAPI
Manual step: ClusterIP
For the moment we don't have LBAAS on Openstack for Api-Servers Workaround: Create a port manualy on prod network on openstack console it will be your CLUSTER_API_IP
Prepare env vars for your cluster.
Manual step: secret cloud.yaml
Based on the file cloud.yaml , create your encoded secret cloud.yaml in base64.
export OPENSTACK_CLOUD_YAML_B64=$(cat cloud.yaml | base64)

# apply the secret in your kind (run once )
envsubst < secret.yaml | kubectl apply -f -
based on env_cos_mutu file create vars file for your cluster and source it:
source env_mutu_svc
Create Calico CRS deployment for your futur clusters:
# create crs
envsubst <  crs/crs-calico.yaml | kubectl apply -f -
Now create your first cluster:
Create cluster command:
# create env_mutu cluster
envsubst <  cluster-template-without-lb.yaml | kubectl apply -f -
When master are available, connect on SSH on one and go on /var/log/cloud-init-output.log. Copy/Past the configuration to configure the kubeconfig file and be able to use kubectl on this master.
mkdir -p $HOME/.kube
sudo cp -i /etc/kubernetes/admin.conf $HOME/.kube/config
sudo chown $(id -u):$(id -g) $HOME/.kube/config
or
export KUBECONFIG=/etc/kubernetes/admin.conf
** Check your cluster status using clusterctl **:
clusterctl describe cluster dev
NAME                                                    READY  SEVERITY  REASON  SINCE  MESSAGE
Cluster/dev                                             True                     18h
├─ClusterInfrastructure - OpenStackCluster/dev
├─ControlPlane - KubeadmControlPlane/dev-control-plane  True                     18h
│ └─3 Machines...                                       True                     18h    See dev-control-plane-5djm7, dev-control-plane-tgs4l, ...
└─Workers
  └─MachineDeployment/dev-md-0                          True                     18h
    └─6 Machines...                                     True                     18h    See dev-md-0-9bh9b-89mq9, dev-md-0-9bh9b-95k5n, ...
Delete cluster command:
# create env_mutu cluster
envsubst <  cluster-template-kubevip.yaml | kubectl delete -f -
Clean Capi in your Kind:
kubectl delete cluster mycluster -n namespace
clusterctl delete --core cluster-api -b kubeadm -c kubeadm -i openstack
Upgrade Components:**
clusterctl upgrade plan
clusterctl upgrade apply --contract v1beta1
Notes :
creation d'un autre cluster dans kind
clusterctl generate cluster capi-quickstart --flavor development
--kubernetes-version v1.32.0
--control-plane-machine-count=1
--worker-machine-count=1
--infrastructure docker \
capi-quickstart.yaml
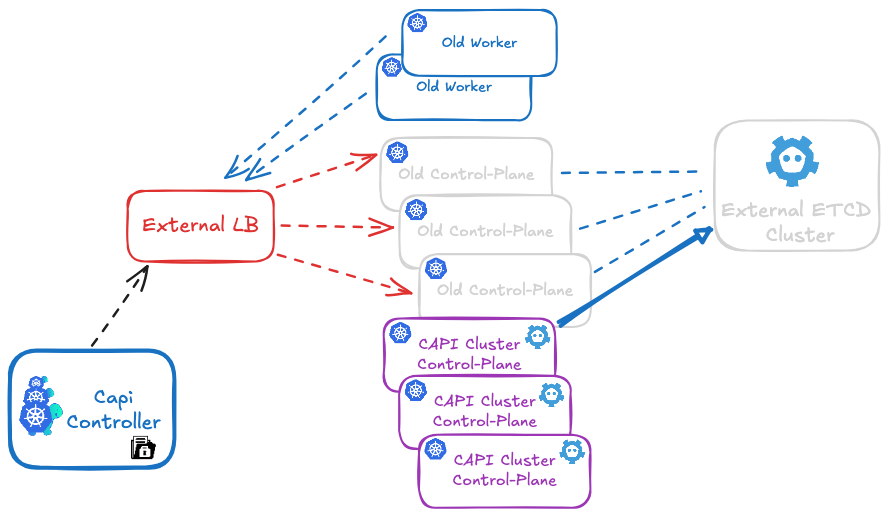
Migrate a legacy K8s Kubeadm Cluster to a Capi K8s kubadm Cluster
Currently, this procedure is in an experimental stage and should be thoroughly tested before being used in a production environment. It is only compatible with an external ETCD and an external LBAAS.
It is designed create cluster.x-k8s.io/secret bundle to migrate a cluster created with kubeadm to a kubeadm-based cluster managed by Cluster API. At this stage, the script has been developed specifically for the Cluster API Provider OpenStack (CAPO ).
My goal is to improve the process to transition from an external ETCD to a local ETCD on the control-plane nodes, and also to migrate from a local ETCD on legacy control-planes to a local ETCD on CAPI control-planes.
The key to this, based on my analysis, would be to force CAPI to add the first control-plane node using a kubeadm join instead of a kubeadm init.
In the case of an external ETCD, this works because the secrets and ETCD are already initialized. The kubeadm init command does not pose any issues, as the kubelet simply joins an already existing API endpoint.
Feel free to share any suggestions or ideas for improvements or future developments.
Migration Process Overview
The procedure is based on having a hybrid legacy/CAPI cluster during the migration.
It is carried out in five main steps:
- Retrieving the necessary secrets and configurations from the existing cluster.
- Preparing the Cluster API (CAPI) configuration.
- Importing the secrets into CAPI.
- Create the CAPI control-plane and CAPI worker nodes on the existing cluster.
- Removing the nodes the old cluster nodes.
Prerequisites
- have a CAPI cluster CAPI Controller should have acces to the api url of the cluster to manage. (https://api.mylegacy_cluster.kubeadm)
1 - Retrieving the necessary secrets and configurations.
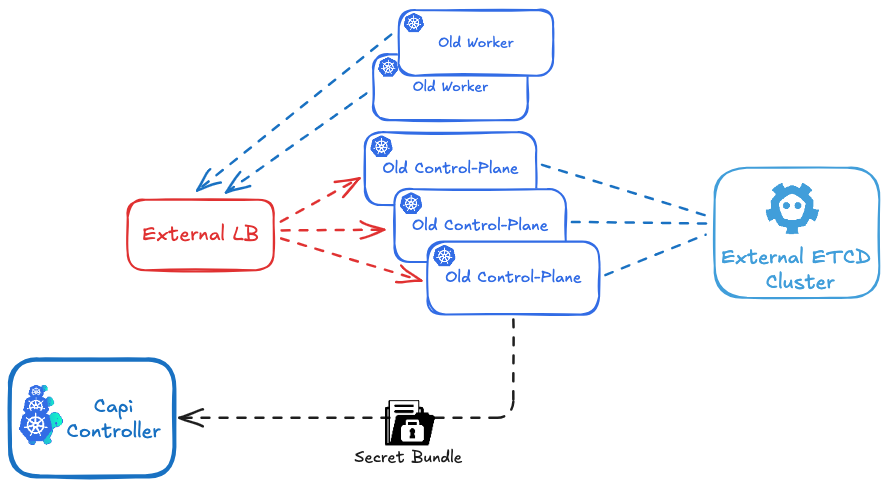
First, run the prepare_secrets.sh script on a control plane node, passing the name of the cluster you want to migrate as an argument. This name should match the cluster_name defined in CAPI.
You can find the script Here.
The script will generate a file named ${CLUSTER_NAME}-secret-bundle.yaml.
./prepare_secrets.sh ${CLUSTER_NAME}
and get the file: ${CLUSTER_NAME}-secret-bundle.yaml
2 - Preparing the Cluster API (CAPI) configuration.
Manual step: secret cloud.yaml
Based on the file cloud.yaml , create your encoded secret cloud.yaml in base64.
export OPENSTACK_CLOUD_YAML_B64=$(cat cloud.yaml | base64)

# apply the secret in your Cluster-api cluster (run once )
envsubst < secret.yaml | kubectl apply -f -
based on env_example file create vars file for your cluster and source it:
source env_example
Now, based on the 'cluster-template-migration.yaml', generate your cluster configuration, and pay close attention to the following parameters:
For the example, I hardcoded the parameters directly in the code, but it's recommended to pass these values as cluster environment variables instead.
- External etcd endpoints in KubeadmControlPlane section :
    ...
    clusterConfiguration:
      etcd:
        external:
          caFile: /etc/kubernetes/pki/etcd/ca.crt
          certFile: /etc/kubernetes/pki/apiserver-etcd-client.crt
          keyFile: /etc/kubernetes/pki/apiserver-etcd-client.key
          endpoints:
          - https://192.168.10.10:2379
          - https://192.168.10.11:2379
          - https://192.168.10.12:2379
    ...
- External Api endpoints in OpenStackCluster section if you use CAPO:
    ...
    controlPlaneEndpoint:
    host: api.mydevcluster.com
    port: 443
    ...
- Add a secutitygroup rule in OpenStackCluster section if you use CAPO to allow traffic beween old and new clusters:
  ...
  managedSecurityGroups:
    allNodesSecurityGroupRules:
    - direction: ingress
      etherType: IPv4
      name: Allow old secutirygroup
      description: "Allow all between old and new control plane and workers"
      remoteGroupID: "old-secutity-group-id"
  ...
3 - Importing the secrets into CAPI.
Apply your ${CLUSTER_NAME}-secret-bundle.yaml into you CAPI Controller Cluster:
kubectl apply -f ${CLUSTER_NAME}-secret-bundle.yaml
Now capi will detecte that a CA and secrets are already exxisting and will not generate a new one.
4 - Create the CAPI control-plane and CAPI worker nodes
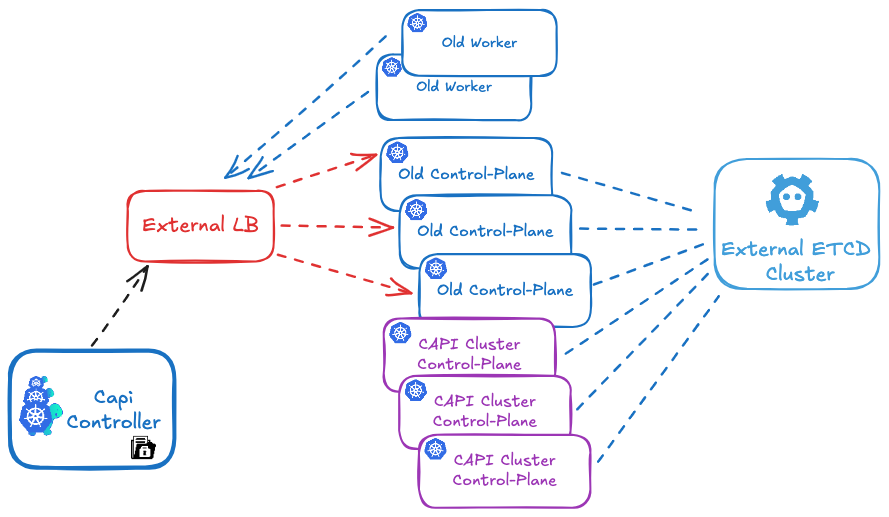
# create capi  ${CLUSTER_NAME} cluster
envsubst <  cluster-template-migration.yaml | kubectl apply -f
Since the etcd database is shared between the old and new cluster, and the PKI secrets (such as TLS certificates and private keys) are identical, creating this new Kubernetes cluster will actually result in the addition of new control plane and CAPI worker nodes to the existing cluster, rather than forming a separate cluster.
Get your cluster state:
You will now see both your old control plane and worker nodes, as well as the new ones, in your cluster using kubectl get nodes.
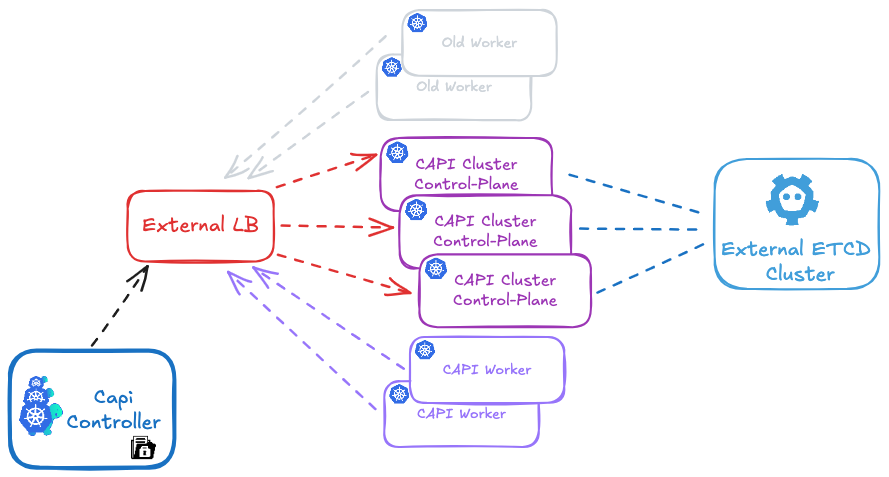
In your CAPI cluster, running the clusterctl command will show only the new nodes that are managed by CAPI:
# Get  ${CLUSTER_NAME} cluster
clusterctl get cluster ${CLUSTER_NAME}

NAME                                                    READY  SEVERITY  REASON  SINCE  MESSAGE
Cluster/dev                                             True                     22h
├─ClusterInfrastructure - OpenStackCluster/dev
├─ControlPlane - KubeadmControlPlane/dev-control-plane  True                     22h
│ └─3 Machines...                                       True                     22h    See dev-control-plane-2xjv4, dev-control-plane-lrt8m, ...
└─Workers
  ├─MachineDeployment/dev-az1                           True                     22h
  │ └─Machine/dev-az1-z6zr4-9dldr                       True                     22h
  ├─MachineDeployment/dev-az2                           True                     22h
  │ └─Machine/dev-az2-nx55k-s265c                       True                     22h
  └─MachineDeployment/dev-az3                           True                     22h
    └─Machine/dev-az3-95fng-hsqfv                       True                     22h
5 - Remove the old cluster nodes
Make sure to update your load balancer (HAProxy or MetalLB) to include the new control plane nodes and remove the old ones.
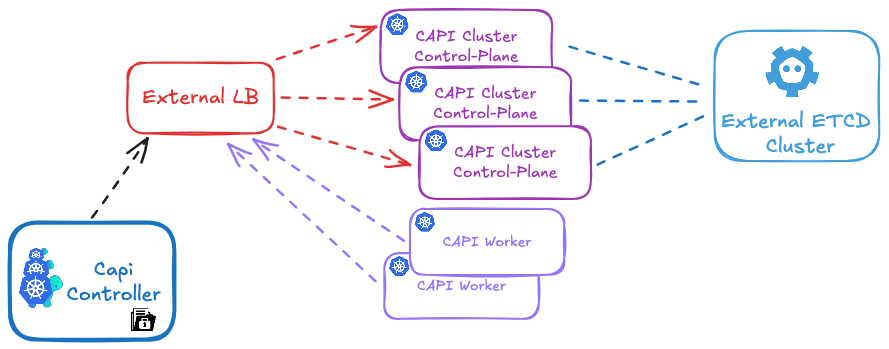
Delete old nodes using:
# Delete old nodes
kubectl delete old-node
Don’t forget to do the same for the old control plane nodes: stop containerd and kubelet to ensure that static pods are no longer running." "And that’s it! You can now enjoy managing your cluster with CAPI 😊.
Migrating from External to Internal etcd with Cluster API
Automating etcd migration for CAPI Kubernetes clusters
By Jean-François Pucheu
Introduction
In my previous article on CAPI migration, I presented a procedure for migrating a kubeadm Kubernetes cluster to Cluster API.
This article presents an automated script that enables migrating a legacy Kubernetes cluster directly to Cluster API with internal (stacked) etcd, in two scenarios:
- Legacy cluster with external etcd: Migration from external etcd to internal CAPI etcd
- Legacy cluster with internal etcd: Migration from a classic kubeadm cluster (with etcd already in stacked mode) to CAPI while preserving etcd data
The etcd_migration.sh script is available on GitHub and automates the migration process for the first CAPI control plane. Once this first control plane is migrated, CAPI automatically handles adding subsequent control planes with their local etcd.
Why This Migration?
The CAPI Standard Approach: Stacked etcd
In a standard Cluster API architecture, etcd is deployed locally on each control plane node in stacked mode. This configuration offers several advantages:
- Simplicity: No external infrastructure to manage, everything is integrated into the control planes
- Native high availability: The etcd cluster automatically follows control plane scaling
- Optimal performance: Minimal latency (localhost) between the API server and etcd
- Cost reduction: No dedicated servers for etcd
- Automated management: kubeadm manages the entire etcd lifecycle
Script Architecture
How It Works
The etcd_migration.sh script implements a progressive migration strategy by adding a new member. This approach allows adding the first control plane with local etcd to the existing etcd cluster (whether external or internal to the legacy cluster).
Crucial point: The script applies only to the first control plane. Once this first control plane is successfully migrated, CAPI automatically handles adding subsequent control planes to the etcd cluster, according to the KubeadmControlPlane configuration.
Two Migration Scenarios
Scenario 1: Legacy Cluster with External etcd
You have a kubeadm cluster with etcd deployed on separate servers:
- 3 external etcd servers (for example: etcd-01, etcd-02, etcd-03)
- 3 kubeadm control planes connecting to this external etcd
- N workers
Migration: The script migrates data from external etcd to the new local etcd of the first CAPI control plane.
Scenario 2: Legacy Cluster with Internal etcd (Stacked)
You have a classic kubeadm cluster with etcd already in stacked mode:
- 3 kubeadm control planes, each with its local etcd
- N workers
Migration: The script migrates data from legacy etcd (already internal) to the new local etcd of the first CAPI control plane. In this case, the "external etcd" mentioned in commands are actually the IP addresses of legacy control planes where etcd runs.
In both cases, the result is identical: a CAPI cluster with local etcd on each control plane.
Script Phases
The script is divided into two distinct phases that must be executed on the first control plane only:
- prekubeadm: Preparation and addition of the new member to the existing etcd cluster
- postkubeadm: Synchronization, leadership transfer, and cleanup of old members
Workflow: Legacy → CAPI Migration with Internal etcd
This workflow shows how to migrate directly from a legacy cluster to CAPI with internal etcd. The procedure is identical whether your legacy cluster has external or internal etcd.
Step 0: Initial State
Scenario 1 - external etcd:
- Legacy cluster with kubeadm
- External etcd (3 separate nodes)
- Legacy control planes (3 nodes)
- Legacy workers (N nodes)
Scenario 2 - legacy internal etcd:
- Legacy cluster with kubeadm
- Local etcd on each control plane (legacy stacked mode)
- Legacy control planes (3 nodes with integrated etcd)
- Legacy workers (N nodes)
Step 1: CAPI Migration Preparation
Using prepare_secrets.sh to prepare secrets:
# On a legacy control plane
./prepare_secrets.sh my-cluster
Step 2: Creating CAPI Cluster with etcd Migration
KubeadmControlPlane configuration to include the migration script:
apiVersion: controlplane.cluster.x-k8s.io/v1beta1
kind: KubeadmControlPlane
metadata:
  name: my-cluster-control-plane
spec:
  replicas: 3
  kubeadmConfigSpec:
    # The script must be present on the machines
    files:
    - path: /usr/local/bin/etcd_migration.sh
      permissions: '0755'
      content: |
        #!/bin/bash
        # Content of etcd_migration.sh script
        # (insert here the script content from GitHub)

    # Execution BEFORE kubeadm init
    # Scenario 1: External etcd server addresses
    # Scenario 2: Legacy control plane addresses (where etcd runs)
    preKubeadmCommands:
    - /usr/local/bin/etcd_migration.sh prekubeadm etcd-01:192.168.3.58 etcd-02:192.168.3.113 etcd-03:192.168.3.178

    # Execution AFTER kubeadm init
    postKubeadmCommands:
    - /usr/local/bin/etcd_migration.sh postkubeadm etcd-01:192.168.3.58 etcd-02:192.168.3.113 etcd-03:192.168.3.178

    initConfiguration:
      nodeRegistration:
        kubeletExtraArgs:
          # your kubelet configurations

    clusterConfiguration:
      # Standard CAPI configuration with local etcd
      etcd:
        local:
          dataDir: /var/lib/etcd
What happens:
- CAPI creates the first control plane
- The
etcd_migration.shscript is copied to the machine viafiles - Before kubeadm executes,
preKubeadmCommandslaunches the script inprekubeadmmode- The script connects to existing etcd (external or on legacy CPs)
- It adds the new control plane as a member of the etcd cluster
- kubeadm executes and initializes the control plane with local etcd
- After kubeadm,
postKubeadmCommandslaunches the script inpostkubeadmmode- Data synchronization
- Removal of old etcd members
- The first control plane is now operational with migrated local etcd
CAPI then automatically adds the 2 other control planes according to your KubeadmControlPlane configuration (replicas: 3), each with its local etcd that synchronizes automatically.
Result:
- Complete CAPI cluster with 3 control planes
- Local (stacked) etcd on each control plane from the start
- Old external etcd servers (scenario 1) or legacy control planes (scenario 2) can be decommissioned
Step 3: Decommissioning
- Monitor the cluster for 7-14 days
- Verify metrics and logs
- Progressively shutdown:
- Scenario 1: Legacy external etcd servers
- Scenario 2: Legacy control planes (with their integrated etcd)
- Keep backups for 30-90 days
- Final resource release
Script Phases
Phase 1: prekubeadm
This phase must be executed BEFORE launching kubeadm on the new control plane.
Main steps:
- Verification of
/run/kubeadm/kubeadm.yamlfile (generated by CAPI) - Generation of temporary client certificates
- Local etcd installation
- Building the
initial-clusterstring including all members - Adding the member to the existing etcd cluster
- Modifying the kubeadm.yaml file with the configuration
Result: The external etcd cluster knows a new member will join, and the system is ready for kubeadm execution.
Phase 2: postkubeadm
This phase must be executed AFTER kubeadm has created the new control plane.
Main steps:
- Cleaning the kubeadm-config ConfigMap
- Waiting for complete synchronization
- Transferring leadership to the new node
- Removing old external members
- Final cluster verification
Result: The first control plane has a fully synchronized local etcd, and old external members are removed.
Advantages of This Approach
For CAPI migrations:
- Direct migration to CAPI with internal etcd, without intermediate step with external etcd
- Immediately results in a CAPI cluster 100% compliant with best practices
- Executes on the first CAPI control plane, then CAPI automatically handles the rest
- Risk reduction: Progressive migration with validation at each level
- Zero downtime: The cluster remains operational throughout the migration
- Easy rollback: Ability to roll back if necessary
- Incremental validation: Testing and validation after each change
- Simplicity: No need to manage an intermediate step with external etcd
Important Technical Details
etcd Quorum Management
The script carefully maintains quorum at all times:
- 3-member cluster: Quorum = 2, tolerates 1 failure
- Adding a member: 4-member cluster, quorum = 3, tolerates 1 failure
- Removing a member: Back to 3 members, quorum = 2
Important: Never remove multiple members simultaneously.
Synchronization
Synchronization relies on comparing revision numbers. The revision is a monotonic counter that increases with each write operation. Two members with the same revision have exactly the same data.
Leadership Transfer
Leadership transfer is important for:
- Performance: Avoid request redirections during removal
- Stability: Ensure the leader is on a node that won't be removed
Conclusion
The etcd_migration.sh script provides an automated solution for migrating a legacy Kubernetes cluster directly to a CAPI cluster with local (stacked) etcd, whether your legacy cluster uses external etcd or etcd already in stacked mode.
This migration ensures:
- Direct migration to CAPI with internal etcd, without intermediate step
- Support for two scenarios: external etcd OR legacy internal etcd
- CAPI cluster 100% compliant with best practices from the start
- Zero downtime during migration
- Data security with validation at each step
- Automation of a complex and risky process
- Modern architecture with local etcd automatically managed by CAPI
The script is available on GitHub and enables a smooth transition from legacy to CAPI, regardless of your current etcd configuration.
Resources
- etcd_migration.sh script on GitHub
- Article: Migration to CAPI
- Cluster API Documentation
- etcd Documentation
Feel free to contact me for any questions or improvement suggestions!
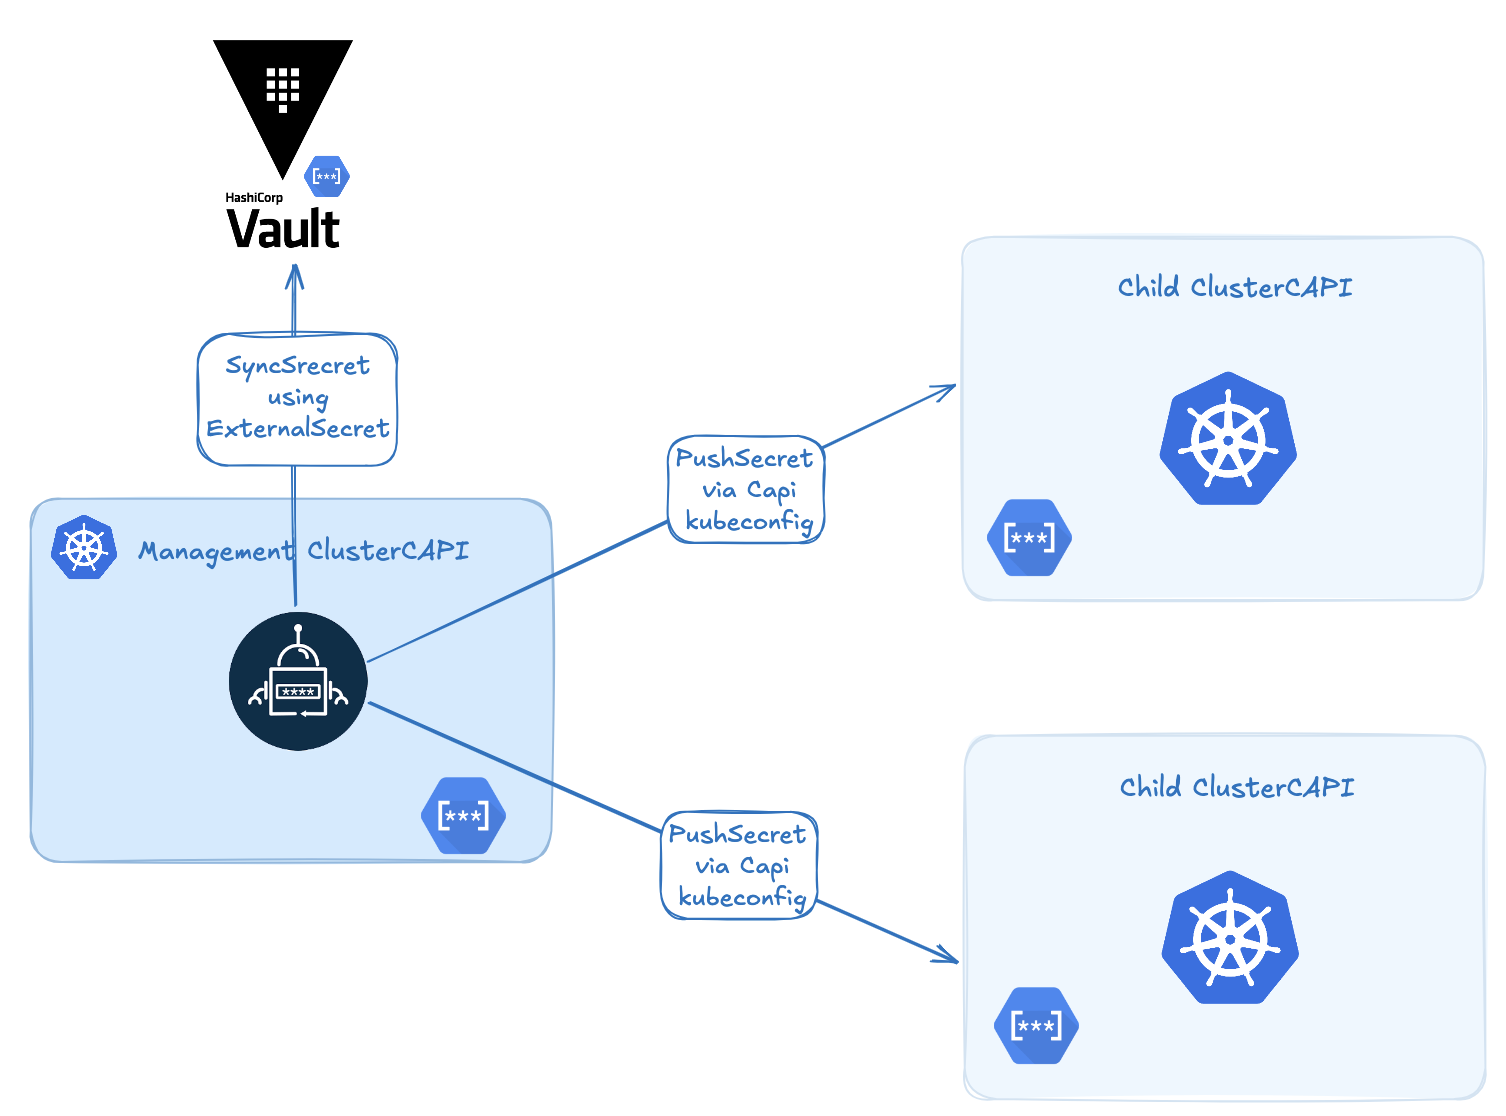
🌱 Securely Bootstrapping Secrets in a ClusterAPI Cluster with ExternalSecrets & PushSecret
When I started automating Kubernetes cluster creation using ClusterAPI, one problem kept coming back:
How can I securely inject secrets into a brand new cluster right at bootstrap — without storing them in Git or relying on fragile post-install hacks?
After a lot of searching, I found a hidden gem in External Secrets Operator (ESO): the powerful but lesser-known PushSecret feature.
🌍 The Problem: Secure Secret Bootstrap
In a typical ClusterAPI setup, you have a management cluster that provisions workload clusters. That works great, but raises a tricky issue:
How can you get critical secrets (certs, tokens, credentials) into a cluster at creation time — securely, and without manual steps?
Most solutions I found fell short:
- Putting secrets in Git (security nightmare),
- Writing brittle post-creation scripts,
- Waiting for the cluster to be ready before installing ESO/Vault (too late for early-stage secrets).
🔑 The Solution: ExternalSecrets + PushSecret
If you’ve used External Secrets Operator before, you likely know it for syncing secrets from Vault, AWS Secrets Manager, GCP Secret Manager, etc. to Kubernetes.
But what many people don’t know is that ESO has a very useful feature called PushSecret.
🧪 What Is PushSecret?
PushSecret lets you sync a Kubernetes secret to another cluster — without installing ESO on the target cluster.
That means you can:
- Define a secret source (Vault, AWS, or even a local
Secret), - Push it from the management cluster to a remote child cluster,
- Do this without Git, without ESO installed on the target, and without manual work.
⚙️ How Does It Work?
Here’s the basic idea:
- Install ESO only on the management cluster.
- Define a
ClusterSecretStore or SecretStore(with kubeconfig) to point to the child cluster. - Create a
PushSecretthat selects a local secret and sends it to the target cluster. - ESO does the sync as soon as the child cluster API is available.
PushSecret Example
Define a RemoteCluster:
apiVersion: external-secrets.io/v1
kind: ClusterSecretStore
metadata:
  name: mycapicluster-secretstore
  namespace: default
spec:
  provider:
    kubernetes:
      # with this, the store is able to pull only from `default` namespace
      remoteNamespace: default
      authRef:
        name: mycapicluster-kubeconfig # name of the kubeconfig child cluster on management cluster
        key: value
        namespace: default
💡 These kubeconfigs are automatically generated by ClusterAPI or its bootstrap provider (CAPBK..
Create a PushSecret to synchronize your secret:
---
apiVersion: external-secrets.io/v1alpha1
kind: PushSecret
metadata:
  name: pushsecret-mysecret
spec:
  refreshInterval: 60s
  selector:
    secret:
      name: mysecret
  secretStoreRefs:
  - kind: ClusterSecretStore
    name: mycapicluster-secretstore
  data:
    - match:
        remoteRef:
          remoteKey: mysecret # Remote reference (where the secret is going to be pushed)
🎯 Real-World Use Cases
Here are some examples where PushSecret has been incredibly helpful:
- 🔐 Injecting CSI driver credentials (e.g., AWS EBS, AzureDisk, Vault CSI),
- 🔑 Sharing a global TLS certificate across all clusters,
- 📦 Distributing container registry tokens (e.g., GitHub Container Registry),
- ⚙️ Bootstrapping cert-manager or external-dns with initial secrets.
Why ClusterAPI + ExternalSecrets = ❤️
The combination of ClusterAPI and ExternalSecrets is extremely powerful — because they work so well together.
When a management cluster uses CAPI to create a child cluster, it automatically:
- Generates the child’s kubeconfig and CA,
- Assigns a predictable name to the child cluster (based on the cluster object).
This means you already know the child cluster name and its credentials at creation time — no waiting, no guessing.
🎯 As a result, you can predefine a PushSecret pointing to the future cluster. As soon as the cluster’s API becomes available, ESO pushes the secret — automatically.
🔍 Concrete Example
Say you’re provisioning a new cluster named devcluster. When ClusterAPI creates it, a Secret named devcluster-kubeconfig is created in the cluster namespace (in our example we create the cluster in a devcluster namespace).
You can reference it like this:
apiVersion: external-secrets.io/v1
kind: ClusterSecretStore
metadata:
  name: devcluster-secretstore
  namespace: kube-system
spec:
  provider:
    kubernetes:
      # with this, the store is able to push only to `kube-system` namespace
      remoteNamespace: kube-system
      authRef:
        name: devcluster-kubeconfig # name of the kubeconfig child cluster on management cluster
        key: value
        namespace: devcluster
---
apiVersion: external-secrets.io/v1alpha1
kind: PushSecret
metadata:
  name: registry-token-push
  namespace: kube-system
spec:
  refreshInterval: 60s
  selector:
    secret:
      name: registry-token
      namespace: kube-system
  secretStoreRefs:
  - kind: ClusterSecretStore # Depending the type of secret you can use SecretStore or ClusterSecretStore
    name: devcluster-secretstore
  data:
    - match:
        remoteRef:
          remoteKey: registry-token # Remote reference (where the secret is going to be pushed)
You can now check the status using:
$ kubectl get pushsecrets -n  kube-system

NAME                    STATUS      AGE
registry-token-push     Synchronized   2m
This can be templated and automated via GitOps as soon as a new cluster is declared. The secret will be in place by the time the cluster is ready.
✅ Benefits
- 🔐 Secure: No secrets in Git.
- ⚙️ Automated: Push as soon as the API is ready.
- 🧼 Minimal: Only install ESO on the management cluster.
- 🌐 Flexible: Works with Vault, AWS, GCP, Azure, and Kubernetes native secrets.
🧵 In Summary
If you’re using ClusterAPI and want a secure, automated way to inject secrets into clusters from day one — check out the PushSecret feature in ExternalSecrets Operator.
It solved a long-standing pain point for me — and might save you hours of scripting and debugging too.
📘 Official Docs:
Resurrect Your Broken Kubernetes Cluster with Just One ETCD Snapshot

Reading time: 8 minutes | Last updated: November 30, 2025
🎯 The Scenario
Your production Kubernetes cluster is gone. Complete datacenter failure. Every node destroyed. But you have one thing: an ETCD backup from yesterday.
In this article, I'll show you how to resurrect your entire cluster using Cluster API (CAPI) and that single ETCD snapshot. Everything — your deployments, secrets, configs, RBAC policies — all restored in less than 30 minutes.
What You'll Learn
- ✅ Why ETCD is your ultimate insurance policy
- ✅ Restore a complete cluster using Cluster API automation
- ✅ Handle the critical kubeadm preflight checks
- ✅ Don't forget the ETCD encryption key (if enabled)
- ✅ Clean up old infrastructure properly
- ✅ The entire disaster recovery workflow
Universal Approach: This works with any Kubernetes cluster — CAPI, kubeadm, EKS, AKS, GKE. The principles remain the same.
⚠️ Critical Warning: If your cluster uses ETCD encryption-at-rest, you MUST have a backup of the encryption key (
/etc/kubernetes/pki/encryption-config.yaml). Without it, all your Secrets will be unreadable after restoration!
📚 Why ETCD is Your Lifeline
The Single Source of Truth
ETCD isn't just a database — it's the brain of your Kubernetes cluster. Everything lives there:
- 🔐 All Secrets and ConfigMaps
- 📦 Every Deployment, Service, and Ingress
- 🎫 Certificates and authentication tokens
- 📊 Complete state of all Pods and Nodes
- 🔒 RBAC policies and ServiceAccounts
- 🎯 CustomResourceDefinitions and their instances
Critical Point: With a recent ETCD backup, you can recreate your entire cluster, even if every node has vanished.
The "Stateless Cluster" Paradigm
A stateless cluster means:
- Workloads are ephemeral: Apps use external persistent storage (EBS, Ceph, NFS)
- Infrastructure is code: Nodes are recreated via Terraform, CAPI, or cloud-init
- State lives in ETCD: All cluster configuration exists in ETCD
This enables ultra-fast disaster recovery: destroy everything, restore ETCD, and your cluster rises from the ashes! 🔥
🔧 Prerequisites
# Required Tools
✓ kubectl (>= 1.28)
✓ clusterctl (Cluster API CLI)
✓ etcdctl (>= 3.4)
✓ curl or aws-cli (for fetching backups)

# Required Access
✓ Management CAPI cluster operational
✓ Recent ETCD backup (< 24h ideally)
✓ Access to backup storage (S3, GCS, HTTP, etc.)

# ⚠️ CRITICAL: ETCD Encryption Key
✓ Backup of ETCD encryption key (if encryption-at-rest enabled)
  Location: /etc/kubernetes/pki/etcd/encryption-config.yaml
  Without this key, your Secrets will be UNREADABLE!
⚠️ Critical: ETCD Encryption Key
If your cluster uses encryption at rest for Secrets, you MUST have a backup of the encryption key. Without it, all your Secrets will be encrypted garbage in the restored cluster.
Check if encryption is enabled:
# On existing control plane
kubectl get pod kube-apiserver-* -n kube-system -o yaml | grep encryption-provider-config

# If you see output, encryption is enabled
Backup the encryption key:
# The encryption configuration file
sudo cp /etc/kubernetes/pki/etcd/encryption-config.yaml /backup/

# Example content:
apiVersion: apiserver.config.k8s.io/v1
kind: EncryptionConfiguration
resources:
  - resources:
      - secrets
    providers:
      - aescbc:
          keys:
            - name: key1
              secret: <BASE64_ENCODED_KEY>  # ← THIS IS CRITICAL!
      - identity: {}
Store it securely:
# Encrypt and store with your ETCD backup
openssl enc -aes-256-cbc -salt -in encryption-config.yaml \
  -out encryption-config.yaml.enc -pass pass:your-secure-password

# Upload alongside ETCD backup
aws s3 cp encryption-config.yaml.enc s3://backups/
🚀 The Complete Restoration Workflow
Architecture Overview
┌─────────────────────────────────────────────────────┐
│         Management Cluster (CAPI)                   │
│  ┌──────────────────────────────────────────────┐   │
│  │  clusterctl creates workload cluster         │   │
│  └──────────────────────────────────────────────┘   │
└─────────────────────────────────────────────────────┘
                         │
                         ↓
┌─────────────────────────────────────────────────────┐
│       New Workload Cluster (empty)                  │
│  ┌──────────────────────────────────────────────┐   │
│  │  1️⃣  Bootstrap control plane nodes            │  │
│  │  2️⃣  Inject restoration script                │  │
│  │  3️⃣  Restore ETCD BEFORE kubeadm init         │  │
│  │  4️⃣  Cluster restored with all resources      │  │
│  │  5️⃣  Clean up old workers & update LB         │  │
│  └──────────────────────────────────────────────┘   │
└─────────────────────────────────────────────────────┘
📝 Step 1: The Restoration Script
This script handles everything: detection, download, validation, and restoration.
#!/bin/bash
set -euo pipefail

# Script: etcd_restore.sh
# Purpose: Restore ETCD from backup before kubeadm init

readonly KUBEADM_FILE="/run/kubeadm/kubeadm.yaml"
readonly BACKUP_URL="https://github.com/your-org/backups/raw/main"
readonly DEFAULT_SNAPSHOT="etcd-snapshot.db.tar.gz"

log() { echo -e "\033[0;32m[INFO]\033[0m $1"; }
err() { echo -e "\033[0;31m[ERROR]\033[0m $1" >&2; exit "${2:-1}"; }

# Only run on control plane nodes
if [ ! -f "$KUBEADM_FILE" ]; then
  log "Not a control plane - skipping"
  exit 0
else
  log "✅ First control plane detected - restoring ETCD"
fi

# Get snapshot name (argument or default)
SNAPSHOT_NAME="${1:-$DEFAULT_SNAPSHOT}"
SNAPSHOT_URL="${BACKUP_URL}/${SNAPSHOT_NAME}"
TEMP_TAR="/tmp/${SNAPSHOT_NAME}"
TEMP_SNAPSHOT="/tmp/etcd-snapshot.db"

# Download backup
log "📥 Downloading snapshot: ${SNAPSHOT_NAME}"
if ! curl -fsSL --retry 3 --retry-delay 5 --max-time 300 \
     -o "$TEMP_TAR" "$SNAPSHOT_URL"; then
  err "Download failed"
fi

[ -f "$TEMP_TAR" ] || err "Snapshot not found after download"
log "✅ Downloaded successfully ($(du -h $TEMP_TAR | awk '{print $1}'))"

# Extract
log "📦 Extracting snapshot..."
tar -xzf "$TEMP_TAR" -C /tmp/ || { rm -f "$TEMP_TAR"; err "Extraction failed"; }
[ -f "$TEMP_SNAPSHOT" ] || err "snapshot.db not found after extraction"

# Verify integrity
log "🔍 Verifying snapshot integrity..."
ETCDCTL_API=3 etcdctl snapshot status "$TEMP_SNAPSHOT" --write-out=table || {
  rm -f "$TEMP_SNAPSHOT" "$TEMP_TAR"
  err "Snapshot corrupted or invalid"
}

# Get node information
HOSTNAME=$(hostname)
HOSTIP=$(hostname -I | awk '{print $1}')
log "Node: ${HOSTNAME} (${HOSTIP})"

# Restore snapshot
log "🔄 Restoring ETCD snapshot..."
ETCDCTL_API=3 etcdctl snapshot restore "$TEMP_SNAPSHOT" \
  --name "${HOSTNAME}" \
  --data-dir /var/lib/etcd \
  --initial-cluster "${HOSTNAME}=https://${HOSTIP}:2380" \
  --initial-advertise-peer-urls "https://${HOSTIP}:2380" \
  --initial-cluster-token "restored-${HOSTNAME}" || err "Restoration failed"

# Verify
[ -d /var/lib/etcd ] || err "ETCD directory not created"
log "ETCD data dir: /var/lib/etcd ($(du -sh /var/lib/etcd | awk '{print $1}'))"

# Cleanup
rm -f "$TEMP_SNAPSHOT" "$TEMP_TAR"

log "✅ ETCD restoration complete - ready for kubeadm init"
🔑 Key Points
- Smart Detection: Checks
/run/kubeadm/kubeadm.yamlto determine if it should run - First Control Plane Only: Uses
grep "kind: ClusterConfiguration"to detect primary node - Idempotent: Can be run multiple times safely
- Error Handling: Fails fast with clear error messages
- Verification: Validates snapshot integrity before restoration
🎭 Step 2: CAPI Manifest Configuration
⚠️ Critical Configuration Points
Here's the complete CAPI manifest with three critical elements you must not forget:
apiVersion: controlplane.cluster.x-k8s.io/v1beta1
kind: KubeadmControlPlane
metadata:
  name: restored-cluster-control-plane
  namespace: default
spec:
  kubeadmConfigSpec:
    # ⚠️ CRITICAL #1: Inject script as a file
    files:
      # The restoration script MUST be injected as a file
      - path: /etc/kubernetes/etcd_restore.sh
        owner: root:root
        permissions: "0755"
        content: |
          #!/bin/bash
          set -euo pipefail
          # Complete script content from above
          # ... (full script here) ...

      # ⚠️ CRITICAL: ETCD Encryption Key (if encryption-at-rest enabled)
      - path: /etc/kubernetes/pki/encryption-config.yaml
        owner: root:root
        permissions: "0600"
        content: |
          apiVersion: apiserver.config.k8s.io/v1
          kind: EncryptionConfiguration
          resources:
            - resources:
                - secrets
              providers:
                - aescbc:
                    keys:
                      - name: key1
                        secret: YOUR_BASE64_ENCODED_KEY_HERE
                - identity: {}

    # ⚠️ CRITICAL #2: Execute BEFORE kubeadm init
    preKubeadmCommands:
      # This runs BEFORE kubeadm init - critical timing!
      - /etc/kubernetes/etcd_restore.sh etcd-backup-20241130.tar.gz

    # Standard kubeadm configuration
    initConfiguration:
      nodeRegistration:
        kubeletExtraArgs:
          cloud-provider: external
        # ⚠️ CRITICAL #3: Ignore preflight error
        # Without this, kubeadm init will fail because /var/lib/etcd already exists
        ignorePreflightErrors:
          - DirAvailable--var-lib-etcd

    clusterConfiguration:
      clusterName: restored-cluster
      apiServer:
        extraArgs:
          enable-admission-plugins: NodeRestriction,PodSecurityPolicy
          # ⚠️ CRITICAL: Enable encryption if it was enabled in original cluster
          encryption-provider-config: /etc/kubernetes/pki/encryption-config.yaml
        extraVolumes:
          - name: encryption-config
            hostPath: /etc/kubernetes/pki/encryption-config.yaml
            mountPath: /etc/kubernetes/pki/encryption-config.yaml
            readOnly: true
            pathType: File
      etcd:
        local:
          dataDir: /var/lib/etcd

  replicas: 3
  version: v1.28.0
⚠️ Three Critical Points Explained
1. Script MUST be injected as a file
❌ WRONG APPROACH:
preKubeadmCommands:
  - curl -o /tmp/script.sh https://... && chmod +x /tmp/script.sh && /tmp/script.sh
Why it fails:
- Network may not be stable during bootstrap
- No content verification possible
- Harder to debug
- Not versioned with your infrastructure
✅ CORRECT APPROACH:
files:
  - path: /etc/kubernetes/etcd_restore.sh
    permissions: "0755"
    content: |
      #!/bin/bash
      # Complete script

preKubeadmCommands:
  - /etc/kubernetes/etcd_restore.sh
Why it works:
- Script is embedded in the manifest
- Guaranteed to be present before execution
- Version controlled with your cluster config
- Easy to audit and debug
2. preKubeadmCommands execution timing
The order of operations is critical:
1️⃣ CAPI creates machine
2️⃣ Cloud-init bootstrap
3️⃣ files: written to disk
4️⃣ preKubeadmCommands: executed  ← Our script runs HERE
   └─ Script restores ETCD to /var/lib/etcd
5️⃣ kubeadm init (with ignorePreflightErrors)
6️⃣ Cluster operational with restored data
If you put it in postKubeadmCommands, it's too late — kubeadm will have already initialized an empty ETCD.
3. ignorePreflightErrors is MANDATORY
Without this, you'll get this error:
[preflight] Running pre-flight checks
error execution phase preflight: [preflight] Some fatal errors occurred:
  [ERROR DirAvailable--var-lib-etcd]: /var/lib/etcd is not empty
Why it happens:
- kubeadm checks that
/var/lib/etcdis empty before initializing - Our script has already restored data there
- We need to tell kubeadm "yes, we know, this is intentional"
Solution:
initConfiguration:
  nodeRegistration:
    ignorePreflightErrors:
      - DirAvailable--var-lib-etcd
🎬 Step 3: Execute the Restoration
Timeline: 0 to 30 Minutes
T+0min: Deploy the Cluster
# Apply the CAPI manifest
kubectl apply -f restored-cluster.yaml

# Watch cluster creation
clusterctl describe cluster restored-cluster --show-conditions all
T+5min: Control Planes Bootstrap
# Watch machines come up
kubectl get machines -w

NAME                                  PHASE      AGE
restored-cluster-control-plane-abc   Running    2m
restored-cluster-control-plane-def   Running    1m
restored-cluster-control-plane-ghi   Pending    30s
T+10min: ETCD Restoration (Automatic)
The restoration happens automatically on the first control plane:
# Logs from the first control plane (via cloud-init)
[INFO] ✅ First control plane detected - restoring ETCD
[INFO] 📥 Downloading snapshot: etcd-backup-20241130.tar.gz
[INFO] ✅ Downloaded successfully (48M)
[INFO] 📦 Extracting snapshot...
[INFO] 🔍 Verifying snapshot integrity...
[INFO] Node: ip-10-0-1-100 (10.0.1.100)
[INFO] 🔄 Restoring ETCD snapshot...
[INFO] ETCD data dir: /var/lib/etcd (1.2G)
[INFO] ✅ ETCD restoration complete - ready for kubeadm init
T+15min: Cluster Operational
# Get kubeconfig
clusterctl get kubeconfig restored-cluster > restored.kubeconfig

# Verify
export KUBECONFIG=restored.kubeconfig
kubectl get nodes
kubectl get pods -A

# 🎉 All your workloads are back!
kubectl get deployments -A
kubectl get secrets -A
kubectl get configmaps -A
What Gets Restored Automatically
✅ All namespaces
✅ All Deployments, StatefulSets, DaemonSets
✅ All Services and Ingresses
✅ All Secrets and ConfigMaps
✅ All RBAC (Roles, ClusterRoles, Bindings)
✅ All PersistentVolumeClaims (PVs reconnect automatically)
✅ All CustomResourceDefinitions and instances
✅ All admission webhooks and configurations
🧹 Step 4: Post-Restoration Cleanup
After restoration, you need to clean up old infrastructure that no longer exists.
1. Remove Old Worker Nodes
The restored cluster state references old worker nodes that no longer exist:
# List all nodes
kubectl get nodes

NAME                    STATUS     ROLES    AGE   VERSION
restored-cp-1           Ready      master   15m   v1.28.0
restored-cp-2           Ready      master   12m   v1.28.0
restored-cp-3           Ready      master   10m   v1.28.0
old-worker-1           NotReady   worker   5d    v1.28.0  ← Old node
old-worker-2           NotReady   worker   5d    v1.28.0  ← Old node
old-worker-3           NotReady   worker   5d    v1.28.0  ← Old node

# Remove old worker nodes
kubectl delete node old-worker-1 old-worker-2 old-worker-3

# Or use a pattern
kubectl get nodes --no-headers | grep NotReady | awk '{print $1}' | xargs kubectl delete node

# Verify cleanup
kubectl get nodes
NAME                    STATUS   ROLES    AGE   VERSION
restored-cp-1           Ready    master   15m   v1.28.0
restored-cp-2           Ready    master   12m   v1.28.0
restored-cp-3           Ready    master   10m   v1.28.0
2. Update Load Balancer Backend Pool
Your load balancer still points to the old control plane IPs. Update it:
AWS (ELB/ALB/NLB)
# Get new control plane IPs
NEW_CP_IPS=$(kubectl get nodes -l node-role.kubernetes.io/control-plane \
  -o jsonpath='{.items[*].status.addresses[?(@.type=="InternalIP")].address}')

echo "New control plane IPs: $NEW_CP_IPS"

# Update target group (replace with your target group ARN)
TARGET_GROUP_ARN="arn:aws:elasticloadbalancing:region:account:targetgroup/..."

# Deregister old targets
aws elbv2 describe-target-health --target-group-arn $TARGET_GROUP_ARN \
  --query 'TargetHealthDescriptions[*].Target.Id' --output text | \
  xargs -n1 | while read target; do
    aws elbv2 deregister-targets --target-group-arn $TARGET_GROUP_ARN \
      --targets Id=$target
  done

# Register new targets
for ip in $NEW_CP_IPS; do
  aws elbv2 register-targets --target-group-arn $TARGET_GROUP_ARN \
    --targets Id=$ip,Port=6443
done

# Verify
aws elbv2 describe-target-health --target-group-arn $TARGET_GROUP_ARN
Azure (Load Balancer)
# Get resource group and LB name
RESOURCE_GROUP="my-rg"
LB_NAME="k8s-lb"
BACKEND_POOL_NAME="k8s-control-plane"

# Get new IPs
NEW_CP_IPS=$(kubectl get nodes -l node-role.kubernetes.io/control-plane \
  -o jsonpath='{.items[*].status.addresses[?(@.type=="InternalIP")].address}')

# Update backend pool
for ip in $NEW_CP_IPS; do
  az network lb address-pool address add \
    --resource-group $RESOURCE_GROUP \
    --lb-name $LB_NAME \
    --pool-name $BACKEND_POOL_NAME \
    --name "cp-${ip}" \
    --ip-address $ip
done

# Remove old addresses (if needed)
az network lb address-pool address list \
  --resource-group $RESOURCE_GROUP \
  --lb-name $LB_NAME \
  --pool-name $BACKEND_POOL_NAME
GCP (Load Balancer)
# Get instance group
INSTANCE_GROUP="k8s-control-plane-ig"
REGION="us-central1"

# List instances
gcloud compute instance-groups managed list-instances $INSTANCE_GROUP \
  --region $REGION

# The new control planes should auto-register if using managed instance groups
# Manual verification:
gcloud compute backend-services get-health k8s-apiserver-backend --global
Manual / HAProxy
Update your HAProxy configuration:
# Edit haproxy.cfg
sudo vi /etc/haproxy/haproxy.cfg

# Update backend section
backend k8s_apiserver
    balance roundrobin
    option httpchk GET /healthz
    http-check expect status 200
    # Replace old IPs with new ones:
    server cp1 10.0.1.100:6443 check
    server cp2 10.0.1.101:6443 check
    server cp3 10.0.1.102:6443 check

# Reload HAProxy
sudo systemctl reload haproxy

# Verify
curl -k https://your-lb-endpoint:6443/healthz
3. Automated Cleanup Script
Here's a complete cleanup script you can run after restoration:
#!/bin/bash
set -euo pipefail

echo "🧹 Post-Restoration Cleanup"

# 1. Remove old nodes
echo "📋 Removing old NotReady nodes..."
OLD_NODES=$(kubectl get nodes --no-headers | grep NotReady | awk '{print $1}')

if [ -n "$OLD_NODES" ]; then
  echo "Found old nodes to remove:"
  echo "$OLD_NODES"
  echo "$OLD_NODES" | xargs kubectl delete node
  echo "✅ Old nodes removed"
else
  echo "✅ No old nodes to remove"
fi

# 2. Get new control plane IPs
echo "📝 New control plane IPs:"
kubectl get nodes -l node-role.kubernetes.io/control-plane \
  -o custom-columns=NAME:.metadata.name,IP:.status.addresses[0].address

# 3. Reminder to update load balancer
echo ""
echo "⚠️  MANUAL ACTION REQUIRED:"
echo "Update your load balancer backend pool with the new IPs above"
echo ""

# 4. Verify cluster health
echo "🔍 Cluster health check:"
kubectl get nodes
kubectl get pods -A | grep -v Running | grep -v Completed || echo "✅ All pods Running"
kubectl get componentstatuses

echo "✅ Cleanup complete"
🔍 Troubleshooting
Problem 1: "Snapshot restore failed"
# Symptom
Error: snapshot file has wrong CRC

# Solution
# Verify snapshot integrity
etcdctl snapshot status backup.db --write-out=table

# Try an older backup
./etcd_restore.sh etcd-backup-previous.tar.gz
Problem 2: "kubeadm init still fails on DirAvailable"
# Symptom
[ERROR DirAvailable--var-lib-etcd]: /var/lib/etcd is not empty

# Cause
Missing ignorePreflightErrors in manifest

# Solution
# Verify in your KubeadmControlPlane:
initConfiguration:
  nodeRegistration:
    ignorePreflightErrors:
      - DirAvailable--var-lib-etcd  # ← Must be present!
Problem 3: "Pods stuck in CrashLoopBackOff"
# Cause
PersistentVolumes not reconnected

# Solution
kubectl get pv,pvc -A

# Force pod recreation
kubectl delete pod <pod-name> --grace-period=0 --force
Problem 4: "Old nodes show as NotReady forever"
# Expected behavior - these are old nodes from the backup

# Solution
kubectl delete node <old-node-name>

# Or batch delete
kubectl get nodes | grep NotReady | awk '{print $1}' | xargs kubectl delete node
Problem 5: "Secrets are unreadable/corrupted after restore"
# Symptom
kubectl get secret my-secret -o yaml
# Returns encrypted garbage or error: "unable to decrypt"

# Cause
Missing or incorrect ETCD encryption key

# Solution
# 1. Verify encryption was enabled in original cluster
kubectl get pod kube-apiserver-* -n kube-system -o yaml | grep encryption-provider-config

# 2. Restore the encryption-config.yaml
# Must be EXACTLY the same key as original cluster
kubectl create secret generic encryption-key \
  --from-file=encryption-config.yaml=/backup/encryption-config.yaml \
  -n kube-system

# 3. Update kube-apiserver manifest to use encryption
# Add to /etc/kubernetes/manifests/kube-apiserver.yaml:
#   --encryption-provider-config=/etc/kubernetes/pki/encryption-config.yaml

# 4. Restart kube-apiserver
kubectl -n kube-system delete pod kube-apiserver-<node-name>

# 5. Verify Secrets are readable
kubectl get secret my-secret -o jsonpath='{.data.password}' | base64 -d
Prevention: Always backup encryption-config.yaml alongside ETCD snapshots!
📊 Success Metrics
Recovery Time Objective (RTO)
| Cluster Size | Target RTO | Observed |
|---|---|---|
| < 10 nodes | 15 min | 12 min ✅ |
| 10-50 nodes | 30 min | 25 min ✅ |
| 50-200 nodes | 1h | 45 min ✅ |
🎓 Key Takeaways
The Three Critical Points
- ⚠️ Inject script as file in
files:section - ⚠️ Execute in preKubeadmCommands (not post!)
- ⚠️ Add ignorePreflightErrors: DirAvailable--var-lib-etcd .
💬 Your Turn
Have you used this procedure? Questions or improvements?
Let's connect:
Published: November 30, 2025
Tags: #Kubernetes #ETCD #ClusterAPI #DisasterRecovery #DevOps #SRE #K8s
💡 Pro Tip: Bookmark this article! When you're in crisis mode at 3 AM with a dead cluster, you'll be glad you did. 😉
If this article saved your cluster, give it a ⭐ and share it with your team!
Other
🧰 Essential DevOps Commands
🐧 Linux Basics
ls -l                         # List files
cd /path/to/dir               # Change directory
pwd                           # Show current directory
cp source.txt destination/    # Copy file
mv file.txt /new/location/    # Move file
rm file.txt                   # Delete file
rm -r foldername/             # Delete folder
cat file.txt                  # View file content
tail -f logfile.log           # View live log output
🐙 Docker & crictl
docker --version                    # Check Docker version
docker ps                           # List running containers
docker ps -a                        # List all containers
docker build -t myimage .           # Build image
docker run -d -p 8080:80 myimage    # Run container
docker stop <container_id>          # Stop container
docker rmi <container_id>           # Remove container
docker exec -it <container_id> bash # Execute command inside container
crictl images                       # Afficher les images locales
crictl pull nginx:latest            # Pull une image depuis un registre
crictl inspect <container_id>       # Inspecter un conteneur
crictl logs <container_id>          # Voir les logs d’un conteneur
crictl info                         # Informations sur le runtime
☸️ Kubernetes
🌍 Terraform
terraform init      # Initialize Terraform
terraform validate  # Validate configuration
terraform fmt       # Format Terraform files
terraform plan      # Create execution plan
terraform apply     # Apply infrastructure changes
terraform destroy   # Destroy infrastructure
⚙️ Ansible
ansible-playbook playbook.yml            # Run a playbook
ansible all -m ping -i inventory.ini     # Ping hosts from inventory
ansible all -a "uptime" -i inventory.ini # Check uptime on remote hosts
☁️ AWS CLI
aws configure                           # Configure AWS credentials
aws s3 ls                               # List S3 buckets
aws s3 cp file.txt s3://bucket-name/    # Copy file to S3

# Launch EC2 instance
aws ec2 run-instances   --image-id ami-xxxx   --count 1   --instance-type t2.micro   --key-name MyKey   --security-groups MySecurityGroup
🧠 Git Cheat Sheet --- Essential Commands
⚙️ Initial Configuration
git config --global user.name "Your Name"
git config --global user.email "your.email@example.com"
git config --list
📂 Create or Clone a Repository
git init
git clone https://github.com/user/project.git
🔄 Track Changes
git status
git add file.txt
git add .
git diff
💾 Save Changes (Commits)
git commit -m "Clear commit message"
git commit -am "Message"
🧩 History and Tracking
git log
git log --oneline --graph --decorate
git show <hash>
🌿 Branches
git branch
git branch new-branch
git checkout new-branch
git switch -c new-branch
git merge other-branch
git branch -d branch
☁️ Working with a Remote Repository
git remote -v
git remote add origin https://github.com/user/project.git
git push -u origin main
git pull
git fetch
♻️ Undo / Fix Changes
git restore file.txt
git restore --staged file.txt
git reset --hard HEAD
git revert <hash>
🧼 Clean Up
git clean -fd
📦 Useful Commands
git stash
git stash pop
git tag v1.0
Benchmark
Script to compare performance across different computers
This Python script generates all prime numbers up to 50 million and measures how long the computation takes.
🎯 Purpose and Usefulness
Performance testing: Demonstrates how long it takes to compute primes with a simple algorithm.
Benchmarking: Can be used to compare performance across different computers, Python versions, or optimization techniques.
Synology
Enable L2TP/IPsec Logs as debug:
vim /var/packages/VPNCenter/etc/l2tp/ipsec.conf
add or uncomment this parameters:
config setup
...
    plutodebug=all
    plutostderrlog=/var/log/pluto.log
Allow UDP 500, 1701 et 4500 on the NAS, don't NAT/transfert 1701 on router.